How to Remove Oil Pan Without Removing Engine: A Detailed Guide
Working on your vehicle’s engine can feel overwhelming, especially when dealing with components like the oil pan. Many drivers assume that removing the oil pan requires taking out the entire engine, but there are techniques that allow you to tackle this task efficiently without going through that extensive process. Understanding the proper approach not only saves time but also prevents unnecessary stress and potential damage to surrounding parts.
Knowing the right tools, access points, and safety measures is crucial before attempting this kind of repair. Being methodical and prepared ensures that you can remove the oil pan cleanly and safely. This task demands attention to detail, particularly when dealing with bolts, gaskets, and oil residue, which can complicate the process if handled carelessly.
For anyone looking to maintain their engine or address leaks, learning how to remove oil pan without removing engine is a valuable skill. With the right guidance, it becomes a manageable task, even for those with moderate mechanical experience. This approach allows you to maintain your vehicle’s performance without undergoing an exhaustive disassembly.
Tools and Equipment
Having the right tools and equipment is essential when working on your vehicle, especially for tasks like removing an oil pan without removing the engine. Using improper tools can make the job difficult, damage components, or even create safety hazards. Preparing all necessary equipment in advance ensures a smoother workflow, reduces frustration, and saves time during the repair process. Knowing what to have on hand allows you to focus on precision and efficiency while keeping the workspace organized.
Socket Sets and Wrenches
Socket sets and wrenches are fundamental for loosening and tightening bolts when removing an oil pan. A quality ratchet with a complete range of sockets, including metric and standard sizes, is essential for reaching bolts of different sizes and positions. Combination wrenches are also useful for tight spots where a socket cannot fit. Having a variety of extensions, swivel sockets, and universal joints ensures that you can access bolts at awkward angles without removing other components.
Using the right size is crucial to avoid rounding off bolt heads, which could complicate the removal process. For professionals and DIY enthusiasts alike, investing in a durable, corrosion-resistant set can make repeated repairs more efficient. Additionally, keeping a torque wrench nearby ensures bolts are reinstalled with the correct tightness, preventing leaks or damage to the oil pan gasket.
Oil Drain Pan and Funnels
An oil drain pan is a must-have when removing an oil pan, as it collects old oil and prevents spills that can damage your workspace. Choosing a pan with sufficient capacity and a low profile allows it to fit under the vehicle without obstruction. Funnels are equally important for controlled pouring when refilling the engine with new oil.
Some funnels come with built-in filters to catch debris, which helps maintain engine cleanliness. Positioning the pan properly before loosening bolts minimizes mess and reduces the risk of slipping hazards. For larger engines, using multiple pans or a spill tray may be necessary to manage oil drainage effectively. A combination of a sturdy drain pan and a flexible funnel makes the process cleaner, safer, and more efficient. Proper handling of old oil also ensures environmentally responsible disposal.
Pry Bars and Scrapers
Pry bars and scrapers are crucial for loosening an oil pan that may be stuck due to old gasket material or sealant. Small pry bars allow careful leverage without bending the pan, while scrapers help remove hardened gasket residue from the mating surface. Using the right technique prevents damage to the engine block or the oil pan itself, which could lead to leaks or additional repairs.
For stubborn pans, gently tapping the pry bar with a rubber mallet can release the seal without deforming the metal. Scrapers with plastic or nylon edges are recommended when dealing with delicate surfaces to avoid scratching or gouging. Properly cleaning the surface before installing a new gasket ensures a tight, leak-free seal, and having these tools ready before starting the job prevents interruptions during the process.
Safety Equipment
Safety equipment is often overlooked but is critical when performing mechanical repairs. Gloves protect your hands from sharp edges, hot surfaces, and harmful chemicals. Safety glasses shield your eyes from splashes of oil, debris, or small metal fragments during scraping or prying. Wearing appropriate clothing and closed-toe shoes minimizes injury risks in the workspace.
Additionally, having jack stands and wheel chocks ensures the vehicle is securely lifted and stable while working underneath it. Using proper lighting, such as portable LED work lamps, allows you to see clearly in tight spaces, reducing mistakes and improving efficiency. Prioritizing safety not only protects you but also makes the task of removing an oil pan without removing the engine more manageable and stress-free.
Preparing Your Vehicle
Proper preparation is crucial before attempting to remove the oil pan without removing the engine. Taking the right steps ensures your safety, prevents damage to vehicle components, and makes the entire process smoother. By organizing your workspace, securing the vehicle, and handling fluids carefully, you can reduce frustration and complete the job efficiently. Preparation also allows you to focus on technique rather than rushing or improvising.
Securing the Vehicle
The first step in preparing your vehicle is ensuring it is stable and safely supported. Park the car on a flat, level surface to avoid accidental movement. Engage the parking brake and place wheel chocks behind the rear wheels for extra security. If lifting the vehicle is necessary, use a reliable floor jack and always support it with jack stands rated for your vehicle’s weight.
Never rely solely on a jack to hold the car while working underneath. Proper stabilization not only keeps you safe but also gives you easier access to the oil pan and surrounding components. Taking a few extra minutes to check stability can prevent serious accidents during the repair process.
Draining the Engine Oil
Before removing the oil pan, the engine oil must be drained to prevent spills and mess. Place a large, low-profile oil drain pan directly under the drain plug and remove the plug carefully. Allow the oil to fully drain, which may take several minutes depending on the engine size.
For vehicles with additional oil filters in tight spaces, it may be necessary to loosen the filter slightly to allow air flow, ensuring a complete drain. Collecting old oil properly avoids contamination and makes cleanup easier. After draining, reinstall the drain plug temporarily to prevent leakage when maneuvering the vehicle for better access to the oil pan bolts. Handling oil responsibly also allows for environmentally safe disposal.
Removing Obstructions
Many engines have components that partially block access to the oil pan. Before attempting removal, identify and temporarily move or remove parts such as splash shields, exhaust components, or brackets that interfere with access. Label bolts and small parts carefully to ensure they can be reinstalled correctly.
For some engines, disconnecting minor accessories like the sway bar links or transmission cross members may provide the clearance needed to slide the oil pan out without removing the engine. Using proper tools and following the manufacturer’s recommendations avoids damage to sensitive components. Taking the time to clear obstructions beforehand ensures a smoother and safer removal process.
Organizing Tools and Materials
Once the vehicle is secure and obstructions are addressed, organizing your tools and materials is essential. Lay out your socket sets, wrenches, pry bars, and scrapers within easy reach. Keep clean rags, a funnel, and the drain pan nearby for quick access during the process. Having a container for bolts and small hardware prevents losing critical pieces.
Proper organization reduces interruptions and allows you to focus on technique rather than searching for tools mid-repair. Preparing a clean, well-lit workspace also improves visibility, making it easier to inspect the oil pan and engine surfaces as you work.
Safety and Personal Preparation
Finally, personal safety should be a priority before starting any repair. Wear gloves to protect against sharp edges and hot surfaces, and use safety glasses to shield your eyes from oil splashes and debris. Dress in close-fitting clothing to avoid getting caught in moving parts or protrusions. Adequate lighting and a comfortable working position prevent strain and errors.
Mental preparation, including reviewing the steps and double-checking tools and safety equipment, ensures confidence and efficiency during the oil pan removal process. Being fully prepared enhances precision and reduces the likelihood of mistakes or accidents.
Accessing the Oil Pan
Accessing the oil pan is one of the most crucial steps when removing it without taking out the engine. Proper access ensures the job can be done efficiently while minimizing the risk of damage to the engine or surrounding components. This stage requires careful preparation, the right tools, and attention to detail to navigate the tight spaces often found beneath a vehicle. Understanding how to approach the oil pan from multiple angles allows for smoother removal and ensures that bolts and gaskets remain intact during the process.
Raising and Securing the Vehicle
The first step to accessing the oil pan is ensuring the vehicle is safely lifted and secured. Begin by parking the car on a level surface and engaging the parking brake to prevent movement. Place wheel chocks behind the rear wheels for extra security. Use a quality floor jack to lift the vehicle, but never rely solely on the jack to support it. Instead, set sturdy, weight-rated jack stands under the frame to stabilize the car. Proper lighting is critical at this stage, as it allows you to see all components, bolts, and obstructions clearly. Working in a well-lit environment reduces the risk of mistakes, such as loosening the wrong bolt or slipping while maneuvering under the vehicle. Taking the time to safely lift and secure the car provides peace of mind and makes the process of removing the oil pan much safer.
It’s also important to ensure there is sufficient clearance between the ground and the oil pan. A low-profile jack stand or adjustable lift may be required for vehicles with limited undercarriage space. Check that your workspace allows you to move freely with tools and drain pans positioned comfortably. Stability and visibility are both critical, and skipping this step can lead to accidents or damage during the repair.
Finally, confirm that the vehicle is fully immobilized before starting work. Attempting to loosen bolts or manipulate the oil pan while the car is unstable can result in injuries or costly mistakes. By carefully raising and securing the vehicle, you create a controlled environment that makes accessing the oil pan more manageable and less stressful.
Removing Lower Components
Many vehicles have parts that obstruct access to the oil pan, and these must be addressed before removal. Common obstructions include splash shields, cross members, or minor engine brackets. Removing these components provides the necessary clearance to reach pan bolts without removing the engine entirely. Begin by identifying all parts that interfere with access and carefully remove them, keeping bolts and hardware organized. Labeling bolts ensures they are reinstalled in the correct locations, avoiding confusion during reassembly.
Some engines require temporarily disconnecting or loosening components like sway bar links, exhaust hangers, or minor accessories to allow proper clearance. Using the right tools, such as ratchets with extensions or universal joints, makes it easier to reach fasteners in tight spots. Avoid forcing tools or bending parts, as this can damage brackets or threads and complicate reassembly. Taking the time to remove or reposition obstructions ensures the oil pan can slide out smoothly and safely.
Clearing obstructions also improves visibility and prevents accidental damage to nearby components like wiring, hoses, or engine mounts. Inspect the area thoroughly, noting tight spots that may require additional maneuvering. A methodical approach at this stage makes the subsequent steps less frustrating and minimizes the risk of mistakes. Ultimately, removing lower components carefully allows for easier, safer access to the oil pan while maintaining the integrity of the surrounding parts.
Positioning the Oil Drain Pan
Properly positioning the oil drain pan is critical when accessing the oil pan, even if most oil has been drained. Residual oil often remains in corners or behind baffles, and having a pan directly beneath the oil pan ensures spills are contained. Use a low-profile pan that fits easily under the vehicle while leaving room to maneuver tools. For larger engines, multiple pans may be necessary to catch all residual fluids.
Positioning the pan correctly also prevents workspace contamination and slippery hazards. Accidental oil spills can create dangerous conditions, especially when working under the vehicle with hand tools. A pan with a wide base ensures stability, while a flexible funnel or spout makes cleanup easier when transferring fluids. Collecting oil efficiently also allows for environmentally safe disposal, as it can be transferred to an approved container without mess.
Careful placement ensures that draining and removing bolts is smooth and controlled. You can loosen fasteners without worrying about oil dripping onto components or floors. For engines with tricky pan angles, adjusting the pan’s position as you work helps accommodate movement and provides uninterrupted workflow. Proper handling of the drain pan makes accessing the oil pan safer, cleaner, and much more manageable.
Inspecting the Oil Pan Area
Before attempting removal, inspect the oil pan area thoroughly. Look for any wiring, hoses, or brackets that could interfere with the removal process. Check for dirt, grime, or debris that could fall into the engine once the pan is loosened. Cleaning this area beforehand prevents contamination and ensures a smoother reinstallation later.
Make note of tight spots where special tools like swivel sockets, extensions, or ratchets may be required. Planning your approach in advance reduces the need for improvisation, which can lead to mistakes or damage. For some engines, bolts may be hidden behind components, requiring careful maneuvering or slight repositioning of adjacent parts. Understanding the pan layout and bolt placement saves time and effort during removal.
By inspecting the area, you also identify potential challenges that might arise during the removal process. Knowing where obstructions, wiring, or hoses are located allows for precise movements, avoiding accidental disconnections or bent components. This preparation step ensures you can work confidently, efficiently, and safely when removing the oil pan without removing the engine.
Loosening and Removing the Oil Pan
Loosening and removing the oil pan is a delicate process that requires precision, patience, and the right tools. Doing it incorrectly can damage the oil pan, gasket surface, or surrounding components. By following a methodical approach, you can remove the oil pan efficiently without needing to remove the engine. Understanding the correct order of steps, applying proper torque techniques, and handling the pan carefully are key to a successful removal.
Loosening Oil Pan Bolts
The first step in removing the oil pan is loosening the bolts that secure it to the engine block. Start by using a socket set with the correct size and a ratchet to gradually loosen each bolt. Work in a crisscross pattern rather than following a linear sequence. This ensures that stress is evenly distributed across the pan and prevents warping or cracking. Some engines may have bolts hidden under brackets or hoses, requiring extensions or universal joints for access.
Avoid applying excessive force when loosening bolts, especially if they are tight or old, as this could strip the threads or break the bolts. If a bolt is particularly stubborn, applying a penetrating lubricant and allowing it to sit for several minutes can help. For rusted or corroded bolts, a careful tap with a rubber mallet may also aid in loosening. Taking your time at this stage ensures a safe and damage-free removal process.
Gradually loosen all bolts, leaving the pan slightly attached at one point to control any remaining oil and prevent sudden spills. Double-check that all hidden or hard-to-see bolts are accounted for before attempting to lift the pan. Maintaining an organized workflow reduces frustration and keeps the process efficient.
Separating the Oil Pan from the Engine
Once all bolts are loosened, the next step is carefully separating the oil pan from the engine block. In many cases, the pan may be stuck due to old gasket material or sealant. Use a plastic or nylon scraper to gently break the seal without scratching the mating surfaces. Small pry bars or specialized oil pan removal tools can also help, but they should be used carefully to avoid bending or warping the pan.
Apply even pressure along the edges, starting from one corner and working gradually around the perimeter. Avoid using metal tools directly against the gasket surface, as this can create scratches that lead to leaks when the pan is reinstalled. Take note of any components that may shift as the pan comes loose, such as sensors, wiring, or hoses, and gently move them aside.
If the pan is particularly stubborn, tapping lightly with a rubber mallet around the edges can help release the seal. Patience is key—forcing the pan can cause permanent damage. Once separated, slowly lower the pan to the drain pan to catch any residual oil that may spill. This controlled approach ensures safety and protects surrounding components.
Handling the Oil Pan Safely
After the pan is free, handle it carefully to avoid damage. Oil pans are often made of thin metal and can bend if dropped or mishandled. Place it on a clean, stable surface to inspect for cracks, warping, or leftover gasket material. Removing old gasket residue completely is critical to ensure a proper seal when reinstalling or replacing the pan.
Take the time to drain any remaining oil from the pan fully, using a funnel or absorbent rags to manage spills. Proper handling prevents messes in the workspace and protects you from slipping hazards. Inspect the surrounding engine area as well, cleaning any oil residue that may have accumulated during the removal.
Proper care and handling at this stage ensure that the oil pan and engine surfaces are ready for reinstallation. Being organized and attentive reduces the risk of leaks and ensures the pan is in good condition for continued use.
Preparing for Reinstallation
Once the oil pan is removed, the engine block and pan surfaces should be thoroughly cleaned. Inspect the bolt threads and surrounding components for wear or damage. This preparation ensures that the new gasket or sealant will adhere correctly, preventing leaks and maintaining engine performance. Keep all bolts and hardware organized for easy reassembly.
At this stage, you can also examine the pan for signs of damage, such as dents, cracks, or excessive wear. Addressing any issues now avoids complications after reinstallation. With the pan removed, cleaned, and inspected, the vehicle is ready for the next steps in maintenance or replacement, keeping the process smooth and efficient.
Cleaning and Inspecting
Cleaning and inspecting the oil pan and gasket surface is a critical step after removal. Proper cleaning ensures that no debris or old gasket material interferes with the seal, which can prevent leaks and maintain engine performance. Inspection allows you to identify damage or wear on the pan or engine block, ensuring that reinstallation or replacement is done correctly. Attention to detail at this stage prevents future problems and makes the repair more durable.
Cleaning the Oil Pan
After removing the oil pan, the first step is thoroughly cleaning it to remove old oil, sludge, and gasket residue. Use a degreaser or a dedicated engine cleaner to break down stubborn grime. Allow the cleaner to soak for a few minutes to loosen deposits, then scrub with a brush or non-abrasive pad. Avoid using metal tools on the pan’s sealing surface to prevent scratches or dents, which could compromise the gasket seal.
For pans with stubborn deposits, repeated cleaning may be necessary. Ensure all corners and crevices are free of sludge, as leftover residue can mix with new oil and cause engine issues. Rinse the pan with warm water if using water-based cleaners and dry it completely with lint-free rags. Proper cleaning ensures a smooth mating surface and reduces the chance of leaks after reinstallation.
Pay special attention to the bolt holes and any recessed areas, where dirt or old sealant can accumulate. Compressed air can be used carefully to blow out hard-to-reach spots. Handling the pan carefully while cleaning prevents bending or warping, preserving its structural integrity for reinstallation.
Inspecting the Oil Pan
Once the pan is clean, a thorough inspection is necessary to identify damage. Look for cracks, dents, or warping, which may compromise the pan’s performance. Even small dents can lead to improper gasket seating and eventual oil leaks. Examine the bolt holes for stripped threads or elongation that could prevent proper tightening during reinstallation.
Inspect the pan’s interior for metal shavings or unusual deposits, which can indicate engine wear or damage. Any significant contamination may require further investigation or replacement of the pan. Also, check for corrosion or rust, particularly in older vehicles, as this can weaken the pan and cause future leaks.
A careful inspection ensures that you address any issues before reinstalling the pan. Noting potential problem areas early allows for timely repairs or replacement, avoiding additional labor later. Proper inspection protects the engine and ensures that the oil pan will perform reliably once reinstalled.
Cleaning the Engine Gasket Surface
The engine block’s gasket surface must also be cleaned thoroughly. Use a non-abrasive scraper or gasket remover to remove all traces of old gasket material and sealant. Avoid using metal scrapers directly on the surface, as scratches can create leak paths. Wipe the surface with a clean, lint-free cloth to remove dust and debris, ensuring a smooth, flat surface for the new gasket.
Double-check for oil residue, dirt, or corrosion around the edges of the pan mounting area. Even minor contaminants can interfere with the seal and lead to leaks. Using a cleaning solvent helps remove stubborn oil residues, improving gasket adhesion. Properly prepared surfaces make reinstallation more efficient and provide a reliable, leak-free seal.
Take time to inspect the mating surface for nicks or imperfections. Minor scratches can sometimes be smoothed carefully, but deep gouges may require professional attention or resurfacing. Ensuring the gasket surface is completely clean and smooth sets the foundation for a successful pan reinstallation.
Inspecting Gaskets and Hardware
Finally, inspect the old gasket and mounting hardware. Old gaskets should generally be replaced, as reusing them can lead to leaks. Examine bolts for wear, corrosion, or stretching, and replace any that appear compromised. Proper hardware ensures that the oil pan can be reinstalled securely, maintaining consistent pressure along the gasket surface.
Organize the bolts and small parts carefully, noting their original positions if sizes vary. A consistent, clean setup simplifies reinstallation and ensures that torque specifications are maintained. Attention to these details guarantees that the oil pan will sit properly, preventing leaks and extending the life of both the pan and the engine components.
Refilling Engine Oil and Testing
Once the oil pan has been cleaned, inspected, and reinstalled, refilling the engine with fresh oil and testing for proper function is the final critical step. Using the correct oil type and quantity ensures optimal engine performance and longevity. Testing afterward helps identify leaks, confirms proper installation, and ensures the engine runs smoothly. Proper execution at this stage guarantees the success of the repair process.
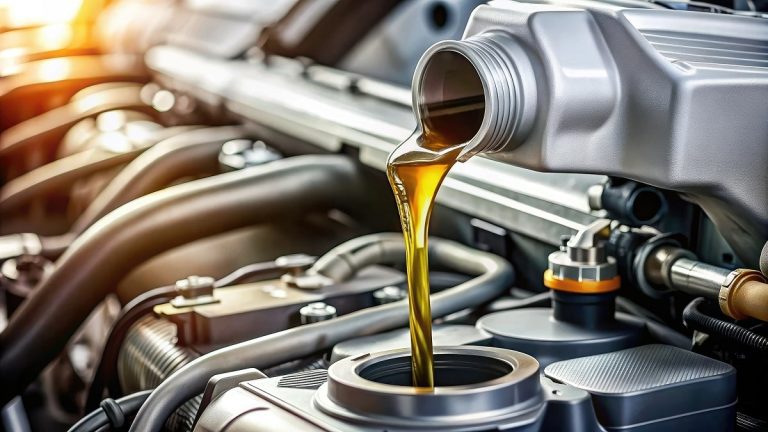
Refilling the Engine with Oil
Start by selecting the correct engine oil as specified in your vehicle’s owner’s manual. Using the recommended viscosity and grade is essential for proper lubrication and engine efficiency. Remove the oil filler cap and use a funnel to pour the oil slowly into the engine. Filling gradually allows you to monitor the level and prevents spills that could create safety hazards in the engine bay.
After pouring in the initial amount, wait a few minutes for the oil to settle. Check the oil dipstick to confirm the level, adding more oil as needed. Overfilling can cause foaming and pressure issues, while underfilling may lead to inadequate lubrication. Take care to clean any spilled oil immediately to avoid damage to hoses or belts. Using high-quality oil and a clean funnel ensures no contaminants enter the engine, maintaining engine health after the repair.
Pouring oil slowly also gives you the opportunity to observe any unusual smells or color, which may indicate remaining contamination. Double-check that the drain plug is secure and that the oil filter is properly tightened before starting the engine. Proper filling and inspection at this stage set the foundation for smooth operation and long-term reliability.
Running the Engine and Checking for Leaks
After refilling, start the engine and let it idle for several minutes. Observe the oil pan area closely to detect any leaks. Proper installation should result in a dry pan surface with no oil dripping from the bolts or gasket. Pay attention to abnormal engine noises, vibrations, or warning lights, which could indicate installation issues or other engine concerns.
Check the oil pressure gauge if available, ensuring the engine reaches normal operating pressure quickly. Low oil pressure can signal a problem with the oil pump, pan installation, or fluid level. Recheck the oil dipstick after running the engine for a few minutes, topping up as necessary. Observing these indicators early prevents potential damage and ensures your repair has been performed correctly.
Additionally, verify that all tools and temporary components used during the repair are removed from the engine bay. A final visual inspection around the oil pan and nearby hoses ensures that everything is properly seated and secure. Attention to these details prevents future leaks or mechanical problems.
Test Driving and Monitoring
After initial testing, take the vehicle for a short, careful test drive. Monitor the engine for unusual sounds, vibrations, or changes in performance. Check the oil pressure and temperature gauges periodically to ensure proper operation. Any unusual behavior may indicate that the oil pan or gasket installation requires adjustment.
After the drive, allow the engine to cool and recheck the oil level and pan area for leaks. Tighten any bolts slightly if minor seepage is observed, but avoid overtightening, which could warp the pan or damage the gasket. Ensuring the oil pan is functioning correctly under driving conditions confirms that the repair was successful.
Consistent monitoring during the first few hours of engine operation after the repair is essential. Catching leaks or other issues early prevents major engine damage and ensures that the oil pan, gasket, and engine remain in optimal condition.
People Also Asked
What Tools Do You Need To Remove An Oil Pan Without Removing The Engine?
To remove an oil pan without taking out the engine, you need a variety of hand tools. A complete socket set with extensions and a ratchet is essential for loosening bolts in tight spaces. Wrenches, a torque wrench, and possibly swivel sockets help access hard-to-reach fasteners. You will also need a pry bar or plastic scraper to separate the pan from the gasket, along with a low-profile oil drain pan to catch residual oil. Gloves, safety glasses, and proper lighting improve safety and efficiency while working under the vehicle.
Additionally, having rags and a container for bolts keeps your workspace organized. This preparation reduces the chance of dropping bolts into the engine bay and ensures you can reinstall the pan smoothly. Being methodical with tools also prevents damage to the oil pan or engine components during the process.
How Do You Safely Lift And Secure The Vehicle?
Before attempting to remove the oil pan, you must safely lift and secure the vehicle. Park the car on a flat surface and engage the parking brake. Place wheel chocks behind the rear wheels to prevent movement. Use a reliable floor jack to lift the vehicle, but never rely solely on it. Always support the car with weight-rated jack stands under the frame to ensure stability.
Proper lighting is also essential for visibility under the vehicle. Ensuring the car is secure reduces the risk of accidents while loosening bolts or maneuvering the oil pan. This safety step protects both you and the engine during the repair process.
How Do You Drain Engine Oil Before Removing The Pan?
Draining the engine oil is a necessary step before removing the oil pan. Place a low-profile drain pan under the oil drain plug and carefully remove the plug, allowing oil to flow completely. For engines with residual oil, slightly tilting the pan or removing the oil filter can help release trapped fluid.
After draining, inspect the used oil for metal shavings or debris, which may indicate engine wear. Clean any spills immediately to prevent slipping hazards. Once drained, reinstall the plug temporarily to avoid leakage while accessing bolts for pan removal. Proper drainage ensures a clean, safe workspace for the next steps.
How Do You Loosen Stubborn Oil Pan Bolts?
Stubborn oil pan bolts can be challenging, especially if they are rusted or overtightened. Start by applying a penetrating lubricant and letting it soak for a few minutes. Use the correct socket size with a ratchet or breaker bar, working gradually to avoid stripping threads. Extensions or universal joints help access bolts in tight spots.
For extremely tight bolts, a gentle tap with a rubber mallet on the wrench can help break the seal. Loosen bolts in a crisscross pattern to prevent warping the pan. Patience during this step avoids damage to both the pan and engine block.
How Do You Separate The Oil Pan From The Engine Block?
Once the bolts are loosened, the oil pan may still stick due to old gasket material. Use a plastic or nylon scraper to gently break the seal without scratching the mating surface. Small pry bars can assist, but apply gradual, even pressure along the edges to avoid bending the pan.
Be mindful of wiring, hoses, and brackets around the pan. A few light taps with a rubber mallet can help release the pan without deforming it. Carefully lowering the pan into a drain pan ensures that any residual oil is collected and the workspace stays clean.
How Do You Inspect And Clean The Oil Pan After Removal?
After removal, thoroughly clean the oil pan to remove sludge, old gasket material, and residual oil. Use a degreaser or engine cleaner and scrub gently with a non-abrasive pad. Avoid metal scrapers on the sealing surface to prevent scratches that could cause leaks.
Inspect the pan for dents, cracks, or corrosion. Check bolt holes for stripped threads and examine the interior for metal shavings or unusual deposits. Cleaning and inspecting the pan ensures that it can be reinstalled safely and maintains a proper seal with a new gasket.
How Do You Reinstall The Oil Pan Without Causing Leaks?
To reinstall the oil pan, ensure both the pan and engine gasket surface are clean and dry. Apply a new gasket or recommended sealant, aligning it carefully with bolt holes. Tighten bolts gradually in a crisscross pattern to ensure even pressure and prevent warping. Use a torque wrench to achieve the manufacturer-recommended specification.
After installation, refill the engine with the correct oil type and quantity. Start the engine and check for leaks at the gasket line. Monitoring oil pressure and rechecking levels after a short run confirms a secure and leak-free installation. Proper care during this step prevents future issues and ensures optimal engine performance.
Final Thoughts
Successfully handling an oil pan replacement without taking out the entire engine can save a lot of time and effort. By carefully following the steps, from preparing your vehicle to safely removing and reinstalling the oil pan, you ensure that the process is efficient and minimizes the risk of damage. Attention to detail, proper tools, and patience are essential throughout this procedure.
Understanding the proper techniques for loosening bolts, removing obstructions, and cleaning gasket surfaces ensures a smooth removal and installation. This method not only helps maintain engine integrity but also prevents leaks and other complications that could arise from improper handling. Following the correct torque specifications and checking for leaks after reinstallation are crucial final steps in this process.
Mastering the process of [how to remove oil pan without removing engine] empowers you to handle oil pan issues confidently. It allows you to save labor costs, work more efficiently, and extend the lifespan of your engine components. Proper execution guarantees a secure fit and reliable performance for years to come.