How to Jump a Car With a Battery Charger Safely and Quickly
A dead car battery has a way of showing up at the worst possible moment, whether you are heading to work or stuck in a quiet parking lot. That sudden silence after turning the key can feel stressful, especially when no other vehicle is nearby to help. In moments like this, knowing an alternative method can save time and frustration.
Many drivers rely on jumper cables and another car, but that option is not always available. A battery charger offers a more controlled and reliable solution that works almost anywhere. It allows you to restore enough power safely without depending on roadside help or a willing stranger.
Learning how to jump a car with a battery charger gives you confidence and independence as a car owner. This approach reduces the risk of electrical damage and helps protect modern vehicle systems that are sensitive to voltage spikes.
With the right steps and a calm approach, the process becomes straightforward and manageable. Understanding what to do before connecting anything makes the experience smoother and helps you get back on the road without unnecessary delays.
Safety Checks Before Using a Battery Charger
Before using a battery charger, it’s essential to perform several safety checks to prevent accidents or damage to your vehicle. A battery stores a significant amount of energy, and improper handling can lead to sparks, short circuits, or even acid leaks. Conducting thorough checks ensures that both you and your car remain safe while restoring power to a dead battery. Following proper precautions also helps extend the life of your battery and the charger itself.
Inspect the Battery for Damage or Leaks
The first safety check is to carefully inspect the battery for any signs of damage. Look for cracks, bulges, or leaks on the battery casing, as these are indicators that the battery may be unsafe to charge. Leaking battery acid is highly corrosive and can cause serious injury or damage to your vehicle. Even small cracks can allow acid to escape, increasing the risk of electrical shorts or fire.
Examine the terminals as well. Corroded, loose, or broken terminals can prevent the charger from working properly and may create sparks during connection. Use a clean cloth to wipe off any corrosion and ensure that all connections are secure. Handling a damaged battery without proper care can be dangerous, so it is recommended to replace any compromised battery before attempting to charge. This initial inspection might take just a few minutes but can prevent major accidents.
Ensure Proper Ventilation in the Charging Area
Charging a battery releases small amounts of hydrogen gas, which is highly flammable. Ensuring proper ventilation is critical to avoid the risk of fire or explosion. Never charge a battery in a completely enclosed space such as a closed garage or near open flames. A well-ventilated area, like an open garage door or outdoor space, helps disperse gases and maintain a safe environment.
Position the charger and battery away from combustible materials, including paper, cloth, or fuel containers. Hydrogen gas is invisible and odorless, so even a small concentration can be dangerous if ignited. It’s also wise to keep a fire extinguisher nearby when charging in case of emergencies. Following these precautions ensures that you are working in a safe environment and reduces the chance of accidents caused by flammable gas buildup.
Verify Charger Compatibility and Settings
Not all battery chargers are compatible with every battery type. Before connecting the charger, verify that the charger matches your battery’s voltage and chemistry, such as 12V lead-acid or AGM batteries. Using the wrong charger or incorrect settings can damage the battery or vehicle electronics and even create a hazardous situation.
Check the charger for damage to cords, clamps, or connectors. Frayed wires or loose connections can produce sparks or short circuits. Ensure the charger is unplugged while inspecting it, and only connect it once all settings are correct. Many modern chargers have safety features such as reverse polarity protection, but relying solely on built-in safeguards without doing a manual check can still be risky. Proper verification ensures a smooth and safe charging process.
Wear Protective Gear and Take Personal Precautions
When handling car batteries and chargers, personal safety is as important as checking the equipment. Wear gloves and safety goggles to protect your hands and eyes from battery acid or sparks. Acid burns can cause serious injury, and goggles prevent accidental splashes from reaching your eyes. Avoid wearing jewelry, loose clothing, or metallic accessories that could accidentally touch terminals and cause a short circuit.
Maintain a stable, upright position for the battery to prevent spills, and handle clamps with care. Always connect the positive clamp first and the negative clamp last to minimize the chance of sparks. Taking these personal precautions reduces the risk of injury and allows you to complete the charging process confidently.
Double-Check Vehicle and Battery Connections
Finally, before turning on the charger, double-check all connections to ensure they are correct and secure. A loose or reversed connection can result in sparks, electrical damage, or a failed charging attempt. Confirm that the positive clamp is attached to the battery’s positive terminal and the negative clamp to the negative terminal or designated grounding point on the vehicle frame.
Verify that there are no obstructions around the battery and charger. Make sure the battery is stable and not likely to tip over during charging. Conducting this final check gives peace of mind and ensures that the process begins safely, avoiding preventable accidents and protecting both the battery and the vehicle’s electrical system.
Tools and Materials Needed
Before attempting to jump a car with a battery charger, gathering the right tools and materials is essential for a safe and efficient process. Having everything ready minimizes the risk of mistakes, protects your vehicle’s electrical system, and ensures that the charging procedure goes smoothly. Proper preparation also saves time, reduces frustration, and gives you the confidence to handle battery issues independently.
Battery Charger and Its Specifications
The most crucial tool you need is a reliable battery charger. Battery chargers come in various types, including manual, automatic, and smart chargers. Each type has its own features and safety functions, such as overcharge protection or reverse polarity alerts. Selecting the correct charger depends on your battery’s voltage and chemistry, typically 12-volt lead-acid batteries in most vehicles.
Ensure the charger has insulated clamps and clear polarity markings to avoid mistakes. Damaged wires or faulty connectors can be dangerous, so inspect the charger before use. Many modern chargers include multiple charging modes for different battery types, which can be helpful if you own multiple vehicles. Understanding the specifications and functions of your charger ensures a safer and more efficient jump-start process.
Protective Gear and Safety Equipment
Personal safety is paramount when working with car batteries. Gloves, goggles, and long-sleeved clothing are necessary to protect your hands, eyes, and skin from corrosive battery acid. Even a small spill can cause burns or permanent damage, so wearing the proper protective gear is non-negotiable.
Keep a fire extinguisher rated for electrical and chemical fires nearby. Sparks can occur if clamps touch the wrong terminal, and a small flare-up can escalate quickly. Having these precautions in place not only protects you but also prevents damage to your vehicle and surroundings. Proper safety equipment is as important as the tools themselves.
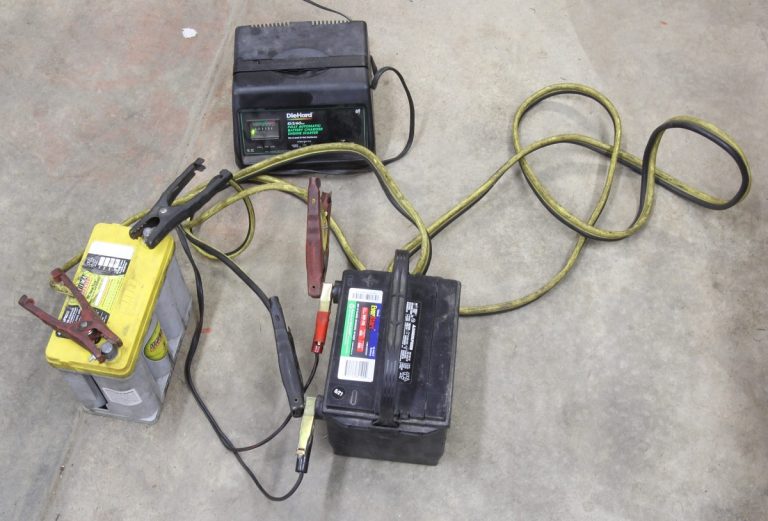
Connecting Cables and Clamps
High-quality connecting cables with insulated clamps are essential for transferring power safely from the charger to the battery. These cables should be thick enough to handle the amperage required for your battery without overheating. Check for any frays, exposed wires, or loose clamps before use.
Clamps must have a firm grip on battery terminals to prevent slipping, which could cause sparks or accidental short circuits. Properly labeled clamps help ensure that the positive and negative terminals are connected correctly, reducing the risk of damage. Investing in durable cables and clamps improves both safety and the efficiency of the charging process.
Cleaning Tools and Battery Maintenance Items
Before connecting the charger, cleaning tools like a wire brush or terminal cleaner may be necessary to remove corrosion from the battery terminals. Corrosion can impede the flow of electricity and prevent the battery from charging correctly. A clean surface ensures a strong connection and minimizes the risk of sparks.
Baking soda mixed with water can neutralize acid spills, while a cloth or paper towel helps wipe away residue safely. Keeping these maintenance items nearby allows for quick adjustments or cleaning without disrupting the charging process. Regular battery maintenance also extends the life of your battery, making this a worthwhile step.
Additional Materials for Convenience
Having additional materials like a flashlight, a small container for tools, and a battery terminal protector spray can make the process smoother. A flashlight is useful for locating terminals in dimly lit areas or under the hood. Terminal protectors help prevent future corrosion after charging, maintaining optimal battery performance.
Keeping all tools organized in one spot prevents distractions and keeps your workspace safe. Being prepared with these extra materials makes the jump-start procedure efficient and reduces the chance of mistakes. With all tools and materials ready, the process becomes safer, faster, and much less stressful.
Preparing the Car and Battery
Proper preparation of both your car and battery is essential before using a battery charger. Taking the right steps ensures safety, prevents damage to your vehicle’s electrical system, and increases the efficiency of the charging process. A few simple checks and adjustments can save time, avoid accidents, and make the overall experience smoother. Ensuring the car and battery are ready helps the charger work effectively and reduces the risk of sparks, corrosion, or electrical shorts.
Position the Car in a Safe and Accessible Spot
The first step is to move your car to a safe, flat, and accessible location. The vehicle should be parked on level ground to prevent it from rolling during the charging process. Engage the parking brake and ensure the transmission is in park for automatic vehicles or neutral for manual cars. This stabilizes the vehicle and prevents accidental movement that could cause injury or damage.
Additionally, make sure the car is in an area with adequate ventilation. Charging a battery produces hydrogen gas, which can be flammable in enclosed spaces. Open the hood fully and clear away any nearby obstacles, debris, or combustible materials. Good positioning also gives you enough room to maneuver the charger, cables, and clamps without awkward stretching, reducing the likelihood of accidental slips or dropped tools.
Turn Off the Vehicle and All Electrical Components
Before connecting the battery charger, it is crucial to turn off the ignition and ensure all electrical components are switched off. This includes lights, radio, climate control, and any aftermarket accessories. Power running through the system while connecting a charger can increase the risk of sparks and electrical shorts.
Switching off everything reduces the load on the battery and allows the charger to work efficiently. It also protects sensitive electronics in modern vehicles that could be damaged by voltage fluctuations during charging. Once all systems are off, wait a few moments to ensure any residual electricity in the system dissipates. This small precaution improves safety and prevents unnecessary strain on your car’s electrical components.
Clean and Inspect Battery Terminals
Battery terminals must be clean and secure before attaching the charger. Dirt, corrosion, or loose connections can prevent a proper flow of electricity and may result in sparks or failed charging attempts. Use a wire brush or battery terminal cleaner to remove any corrosion, dirt, or residue from both positive and negative terminals.
Check the battery posts for cracks, leaks, or swelling in the casing, as damaged batteries can be unsafe to charge. Tighten any loose connections, but avoid overtightening, which could damage the terminals. Clean and properly connected terminals create a stable and reliable path for electricity, improving the efficiency of the charging process while minimizing hazards.
Identify Positive and Negative Terminals
It’s vital to correctly identify the positive (+) and negative (-) battery terminals before attaching the charger. The positive terminal is usually marked with a plus sign or red cover, while the negative terminal has a minus sign or black cover. Attaching the clamps incorrectly can result in sparks, damage to the battery, or harm to your vehicle’s electronics.
After identifying the terminals, ensure that clamps will make firm contact without slipping. Some vehicles may require connecting the negative clamp to a grounding point on the chassis instead of directly on the battery to minimize the risk of sparks. Correct identification and careful attachment of terminals are essential to a safe and successful charging process.
Remove Obstructions and Accessories Near the Battery
Finally, clear the area around the battery of any loose tools, wires, or accessories. Remove plastic covers or components that could interfere with clamps or restrict airflow. Adequate clearance ensures that the charger can be positioned safely and securely, reducing the likelihood of accidental short circuits or physical damage to surrounding components.
Check for belts, moving parts, or other hazards near the battery compartment. This step prevents injuries while maneuvering the charger or connecting cables. A clean and organized battery area not only makes the process safer but also allows for better visibility, ensuring each step is performed accurately.
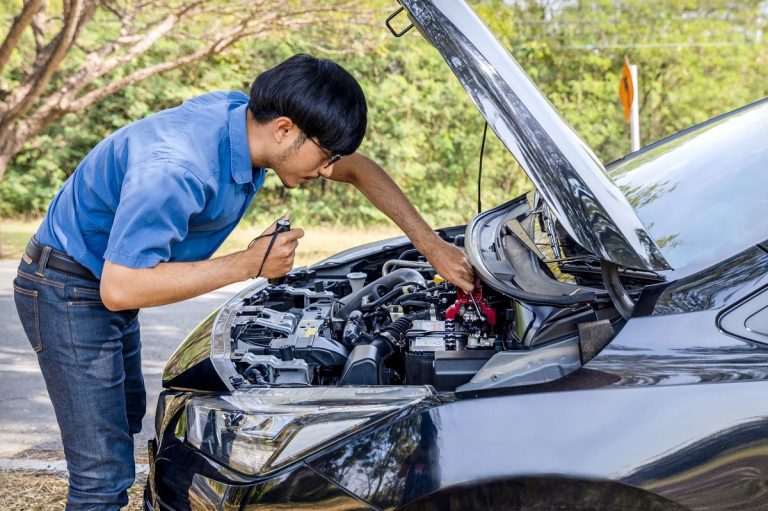
Charging Process to Jump-Start the Car
The charging process is the core step in jump-starting a car using a battery charger. Following the correct procedure ensures safety, protects your vehicle’s electrical system, and restores enough power to get your engine running. Understanding each step, from connecting clamps to monitoring the charging progress, is essential for a smooth and effective experience. Proper execution minimizes the risk of sparks, battery damage, or personal injury.
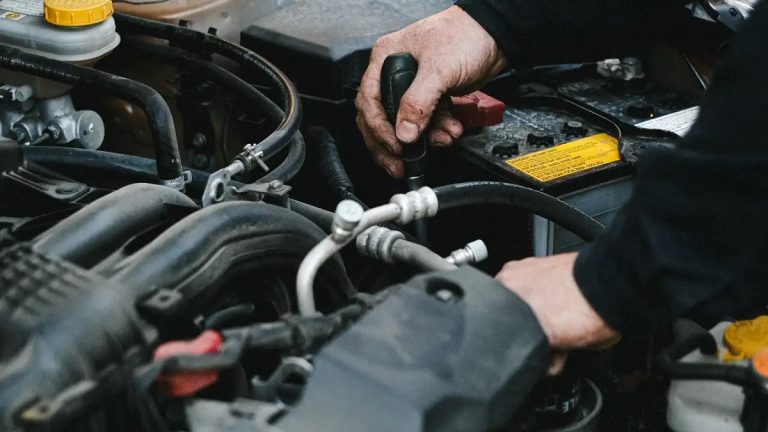
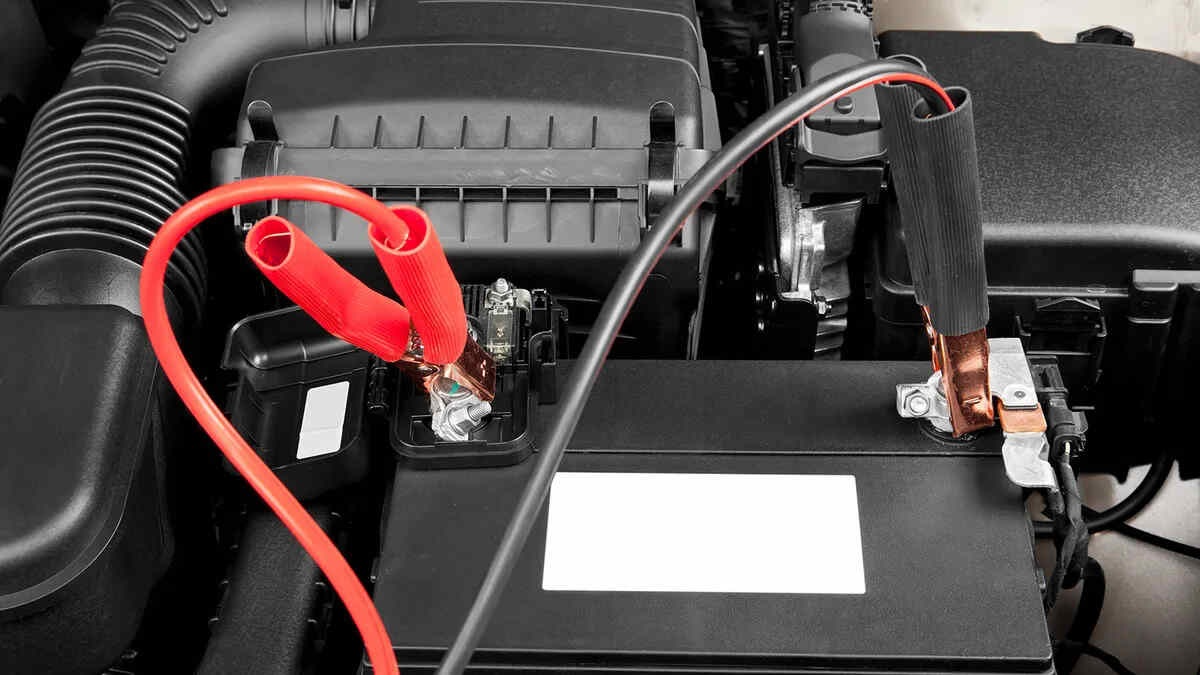
Connect the Charger to the Battery Correctly
Start by ensuring the charger is turned off and unplugged. Then, attach the positive clamp to the positive (+) battery terminal and the negative clamp to the negative (-) terminal or the vehicle’s grounding point. Many modern chargers include a reverse polarity warning, but relying solely on this feature is risky. Confirming proper connections manually is safer and ensures the charger functions correctly.
Make sure the clamps are secured firmly and do not touch each other during the process, as this can cause sparks or short circuits. A stable connection ensures electricity flows smoothly from the charger to the battery. Take care to keep hands, tools, and other metallic objects away from the clamps during attachment. A well-connected battery and charger setup is the foundation for a successful jump-start.
Select the Appropriate Charging Mode and Settings
Once the clamps are connected, choose the correct charging mode on your charger. Most chargers offer settings for slow charging, fast charging, or maintenance modes. Slow or trickle charging is safer for a deeply discharged battery and reduces the risk of overheating or damage. Fast charging can work in emergencies but should be monitored closely.
Confirm the voltage matches your battery type, usually 12V for standard car batteries. Modern smart chargers may automatically detect voltage and adjust current flow, but understanding the settings ensures the process is accurate. Double-check the charger display for current, voltage, and error indicators before switching it on. Proper settings prevent overcharging and maintain the health of the battery.
Monitor the Charging Progress
While the battery charges, regularly monitor the progress to ensure everything operates safely. Check the charger’s display for voltage and amperage readings. If the battery appears to be swelling, leaking, or producing excessive heat, immediately turn off the charger. Monitoring prevents dangerous situations such as acid spills or electrical shorts.
Many chargers include indicators that show when the battery is ready to start the vehicle. Patience is key, especially with slow charging, as a battery may take several hours to reach sufficient charge. Avoid attempting to start the car too early, as this can strain the battery and reduce its lifespan. Observing the process carefully ensures a controlled and successful jump-start.
Disconnect the Charger Safely
Once the battery has reached an adequate charge, turn off the charger before removing the clamps. Disconnect the negative clamp first, followed by the positive clamp. This order minimizes the risk of sparks near the battery. Never remove clamps while the charger is still running, as sudden sparks can damage both the battery and vehicle electronics.
Handle the clamps carefully and store the charger in a safe, dry place for future use. Inspect the battery one final time for any signs of stress or leakage before attempting to start the car. Proper disconnection preserves the battery’s health and ensures that the vehicle’s electrical system remains safe.
Attempt to Start the Vehicle
With the battery fully charged and clamps safely removed, attempt to start the car. The engine should turn over smoothly if the charging process was successful. If the vehicle struggles to start, allow the battery more time on the charger, as some deeply discharged batteries require extended charging periods.
After the engine starts, keep the car running for a while to allow the alternator to further recharge the battery. Avoid turning off the vehicle immediately, as this could require repeating the jump-start process. Following a careful charging process ensures that your car starts reliably and maintains a healthy battery for future use.
Starting the Car After Charging
Once the battery has been charged using a battery charger, the next step is to start the vehicle safely. This stage is critical because improper handling can negate all the effort put into charging. Following a careful process ensures the engine starts smoothly, the battery maintains its charge, and the vehicle’s electrical system remains protected. Proper preparation and patience make this step simple and stress-free.
Ensure All Connections Are Properly Removed
Before attempting to start the car, make sure the battery charger is turned off and all clamps are safely disconnected. Remove the negative clamp first, followed by the positive clamp, to minimize the risk of sparks. Handle the clamps carefully and avoid letting them touch each other or any metal parts of the car.
Inspect the battery terminals to ensure they are clean, dry, and free of corrosion. A secure connection helps the battery deliver maximum power to the starter motor. Double-check that no tools, wires, or other objects are near the battery area. Taking the time to remove connections safely prevents short circuits, sparks, or damage to the vehicle’s sensitive electronics.
Turn On the Ignition and Observe Engine Response
With all connections properly removed, sit in the driver’s seat and turn the ignition key or press the start button. The engine should crank smoothly and start without hesitation. Pay attention to unusual noises, hesitation, or failure to crank, which could indicate the battery isn’t fully charged or there is an underlying issue with the vehicle.
If the engine starts normally, let it run at idle for a few minutes. This allows the alternator to supply additional charge to the battery and stabilizes electrical systems throughout the car. Avoid immediately turning off the engine after starting, as the battery may still be in a recovery phase and could lose charge if the alternator hasn’t replenished it fully.
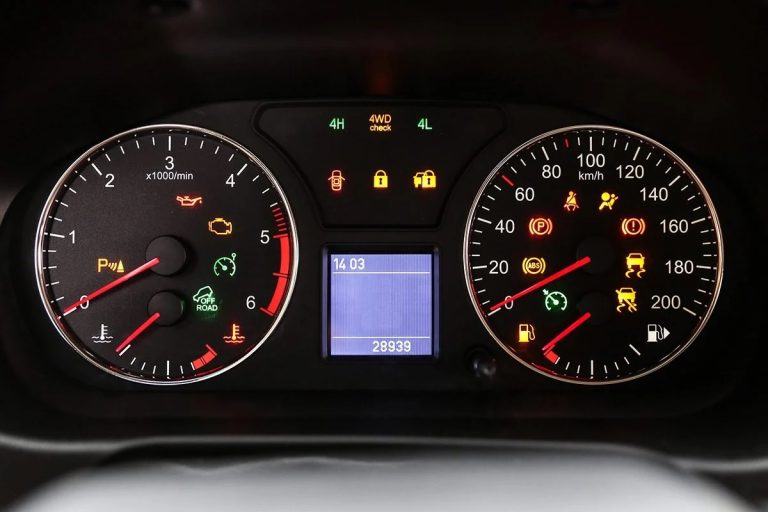
Monitor Dashboard Indicators and Electrical Systems
While the engine is running, check the dashboard for warning lights or indicators, especially the battery or charging system warning lights. These can provide insight into whether the battery is maintaining proper voltage and if the alternator is functioning correctly.
Test essential electrical components like headlights, radio, and air conditioning to ensure they operate as expected. Proper functioning indicates that the battery is providing consistent power and the vehicle’s electrical system is stable. Early detection of anomalies can prevent future problems and ensure that the jump-start process was effective.
Allow the Battery to Recharge Fully While Driving
After a successful start, it’s important to let the vehicle run for an extended period or take it on a short drive. The alternator will continue to charge the battery, helping it recover from deep discharge. Driving at moderate speed for 20 to 30 minutes is typically sufficient to restore a healthy charge.
Avoid turning off the engine too soon after starting, especially if the battery was deeply discharged. Repeated short starts without adequate recharging can reduce battery lifespan and efficiency. By allowing the battery to recharge fully while driving, you ensure a reliable start for future trips and reduce the likelihood of being stranded due to a low battery.
Prepare for Future Battery Maintenance
Once the car has started successfully, consider checking the battery’s overall health. Use a multimeter or battery tester to verify voltage and capacity. If the battery shows signs of weakening, it may be time for replacement or regular maintenance.
Keeping the battery terminals clean and checking electrolyte levels (if applicable) can prolong battery life. Scheduling periodic checks and ensuring proper charging habits prevents future jump-starts and keeps your car ready for everyday use. Starting the car correctly after charging not only restores immediate functionality but also supports long-term battery health.
FAQs
How Do You Safely Connect a Battery Charger to a Car?
To safely connect a battery charger, first ensure the charger is unplugged and turned off. Identify the positive (+) and negative (-) terminals on the battery. Attach the positive clamp to the positive terminal and the negative clamp to the negative terminal or a grounded metal part of the car.
Check that the clamps are secure and won’t slip, and make sure no tools or metal objects touch the terminals during connection. This prevents sparks, short circuits, and damage to the vehicle’s electrical system. Always follow the correct order when connecting and disconnecting the clamps.
Can You Jump a Car Without Another Vehicle Using a Charger?
Yes, you can jump a car without another vehicle by using a battery charger. A charger provides a controlled flow of electricity to restore the battery’s charge without relying on external power from another car. This method is especially useful if you are alone or in an area with no available vehicles.
Ensure that the charger is compatible with your battery type and voltage. Connect the clamps carefully and monitor the charging process. A fully charged battery from a charger can start your car safely, making it an independent and reliable alternative to traditional jumper cables.
How Long Does It Take to Jump a Car With a Battery Charger?
The time it takes depends on the battery’s condition and the charger type. Slow or trickle charging may take several hours for a deeply discharged battery, while fast chargers can deliver enough power in 30 minutes to an hour.
Monitoring the charger’s display or indicators ensures you don’t overcharge the battery. Rushing the process can reduce battery life or cause overheating. Patience is key, and allowing the battery to reach a safe charge level before starting the car ensures a smooth engine start and protects the electrical system.
What Precautions Should You Take Before Using a Battery Charger?
Before using a battery charger, wear protective gloves and goggles to prevent acid burns or sparks from harming you. Inspect the battery for leaks, cracks, or corrosion, and clean the terminals if necessary. Ensure the vehicle is in a well-ventilated area to prevent hydrogen gas buildup, which can be flammable.
Turn off all electrical components in the car, including lights, radio, and climate controls. Verify the charger’s compatibility with your battery type and voltage. These precautions reduce the risk of injury, damage to the battery, and harm to the car’s sensitive electronics.
What Do You Do If the Car Doesn’t Start After Charging?
If the car doesn’t start after charging, first ensure the battery received enough charge. Some deeply discharged batteries may require extended charging before they can deliver sufficient power. Double-check that the charger clamps were properly connected and that no corrosion or loose connections exist.
If the car still won’t start, test the battery with a multimeter or consider that the battery may be damaged and needs replacement. It’s also possible that the starter or alternator has an issue. Avoid repeatedly attempting to start the car with a weak battery to prevent further damage.
Can Using a Battery Charger Damage the Car’s Electronics?
Using a battery charger incorrectly can potentially damage sensitive electronics in modern vehicles. High voltage spikes or reverse polarity connections are the most common causes of electronic damage. Using a smart or automatic charger with built-in safety features minimizes this risk.
Always connect the clamps correctly, set the proper voltage, and monitor the charging process. Avoid using an incompatible charger or fast charging a severely discharged battery without supervision. Following these steps protects onboard computers, sensors, and entertainment systems from voltage fluctuations during the jump-start process.
How Often Can You Jump a Car With a Battery Charger?
Jump-starting a car with a battery charger should not be a frequent solution. Repeatedly discharging and recharging a battery can shorten its lifespan. A battery charger is best used in emergencies or when the battery has temporarily lost power.
For long-term reliability, maintain your battery with regular checks and top-ups. Ensure the alternator is functioning correctly and replace weak or aging batteries promptly. Using the charger responsibly helps you safely start your car without compromising battery health or vehicle electronics over time.
Conclusion
Taking the right steps and staying patient can make a big difference when dealing with a dead car battery. Using the proper equipment, following safety checks, and allowing enough charging time helps protect both you and your vehicle from unnecessary damage. A calm and careful approach always leads to better results.
Understanding how to jump a car with a battery charger gives you confidence in unexpected situations. When the connections are secure and the charger settings match your battery, the process becomes reliable and far less stressful. It also reduces the risk of sparks, electrical issues, or battery failure.
Once the car starts, letting the engine run and monitoring battery health ensures longer-lasting performance. Regular maintenance and awareness can prevent repeat problems, saving time and money. With the right habits, this method becomes a dependable solution whenever your battery needs a boost.