Rebuilding an Engine With No Experience: Step-by-Step Guide
Taking on the challenge of working on a car engine can be both exciting and intimidating, especially for someone just starting out. Engine work involves precision, mechanical knowledge, and attention to detail, but even beginners can learn the ropes with patience and guidance. The process can be incredibly rewarding, giving a sense of accomplishment when you hear the engine roar back to life.
Understanding the basics of engine components and their functions is a crucial first step. Learning about pistons, crankshafts, camshafts, and valves provides the foundation needed to handle more complex tasks. Even without formal training, studying manuals, watching tutorials, and observing experienced mechanics can build a strong understanding of engine mechanics.
Rebuilding an engine with no experience may seem daunting, but with the right mindset, preparation, and willingness to learn, it becomes achievable. Proper planning, taking notes, and documenting each step ensures mistakes are minimized.
Starting with small projects or older engines allows you to practice techniques and gain confidence before attempting larger, more complicated rebuilds. With dedication, hands-on practice, and careful attention, rebuilding an engine can become a fulfilling and educational experience.
Essential Tools and Equipment Needed
Rebuilding an engine requires more than determination and patience; having the right tools and equipment is crucial for success. Using proper tools ensures precision, safety, and efficiency during the process. For someone attempting rebuilding an engine with no experience, assembling the right set of equipment can make the learning curve smoother and reduce the likelihood of mistakes that can damage the engine.
Basic Hand Tools
The foundation of any engine rebuild is a set of high-quality hand tools. These include wrenches, ratchets, sockets, screwdrivers, pliers, and torque wrenches. A torque wrench is especially important for tightening bolts to the manufacturer’s specifications, preventing damage to engine components.
Having a variety of socket sizes, both standard and deep, ensures access to bolts in tight spaces. Screwdrivers with different head types, including flathead and Phillips, help remove smaller components without stripping screws. Pliers and needle-nose pliers are useful for handling clips, pins, and hoses safely. Investing in sturdy, reliable hand tools makes the rebuild process more precise and less frustrating for beginners.
Specialty Automotive Tools
Beyond basic hand tools, certain specialty tools are essential for engine rebuilding. These include engine hoists, engine stands, cylinder hone kits, valve spring compressors, and piston ring compressors. An engine hoist allows safe removal and installation of heavy engine blocks, while an engine stand holds the engine securely in place for detailed work.
Valve spring compressors make it easier to remove and install valve springs without damaging them. Piston ring compressors allow pistons to be seated correctly into cylinders. Additionally, timing tools, dial indicators, and feeler gauges ensure precise measurements and proper alignment. Beginners should focus on acquiring the tools most relevant to the engine they are rebuilding and gradually expand their collection as experience grows.
Measuring and Diagnostic Equipment
Accurate measurements are vital when rebuilding an engine. Tools like micrometers, calipers, and plastigage help verify tolerances on components such as crankshafts, pistons, and bearings. Ensuring parts meet manufacturer specifications prevents long-term engine damage and ensures smooth operation.
Compression testers and leak-down testers can also be valuable for assessing engine health before and after the rebuild. These diagnostic tools help identify worn components, cracks, or leaks that may require attention. Beginners may start with a basic set of measuring tools and expand their collection as they gain confidence and understanding of engine tolerances.
Safety Gear and Workstation Setup
Rebuilding an engine involves heavy lifting, sharp objects, and exposure to oils and chemicals. Personal protective equipment, including gloves, safety glasses, and steel-toed shoes, is essential for safety. Wearing proper clothing and keeping hair tied back prevents accidents during intricate tasks.
A clean, organized workspace is equally important. A sturdy workbench with ample lighting and storage for parts and tools reduces errors and confusion. Labeled containers and trays for bolts and small components ensure nothing is lost during disassembly or reassembly. For beginners, maintaining a well-organized and safe environment improves efficiency and builds confidence.
Cleaning and Lubrication Equipment
Engine rebuilding requires thorough cleaning of all parts to remove old oil, carbon deposits, and debris. Parts washers, brushes, and degreasers are necessary for this task. Using proper cleaning techniques prevents contamination and ensures longevity of rebuilt components.
Lubrication equipment such as assembly lube, oil cans, and grease is crucial when installing moving parts. Proper lubrication reduces friction, prevents premature wear, and ensures smooth engine startup. Beginners should familiarize themselves with which components require assembly lube and which can be pre-lubricated with standard engine oil.
Preparing for Your First Engine Rebuild
Successfully rebuilding an engine requires more than just tools; preparation is key, especially when you are new to the process. Proper planning ensures efficiency, minimizes mistakes, and builds confidence throughout the rebuild. By organizing your workspace, understanding engine components, and gathering reference materials, you lay the groundwork for a smoother and safer experience during your first rebuild.
Research and Learning
Before touching any engine parts, gaining knowledge about the specific engine you plan to rebuild is essential. Study the service manual, watch step-by-step tutorials, and read guides focused on engine rebuilding. Understanding the engine’s layout, torque specifications, and assembly sequence helps prevent costly mistakes.
Learning about each component, from pistons and crankshafts to valves and timing chains, allows you to anticipate challenges. Beginners should also research common pitfalls associated with their engine model, including weak components or parts that require special attention. Knowledge gained during this stage builds confidence and reduces anxiety during the hands-on process.
Organizing Workspace and Tools
A clean, well-organized workspace is crucial for beginners attempting their first engine rebuild. Allocate enough space for engine disassembly, cleaning, and reassembly. Use labeled containers, trays, and magnetic parts organizers to keep bolts, nuts, and small components sorted.
Ensure that essential tools and measuring equipment are within reach, including hand tools, specialty compressors, torque wrenches, and micrometers. Adequate lighting, ventilation, and safety equipment such as gloves and eye protection create a safer and more efficient environment. Preparation at this stage reduces frustration and minimizes the risk of losing parts or making errors.
Planning the Rebuild Process
Mapping out the rebuild process before starting is critical for success. Break the project into clear stages, including disassembly, inspection, cleaning, measurement, component replacement, and reassembly. Prepare a checklist of each step to ensure nothing is skipped.
Scheduling sufficient time for each phase prevents rushing and allows you to double-check work as you progress. Begin by familiarizing yourself with the engine layout, noting torque specs, alignment marks, and any special procedures required for your specific engine model. Planning the rebuild in stages also makes it easier to track progress and manage unexpected challenges without getting overwhelmed.
Sourcing Parts and Supplies
Having all necessary replacement parts and supplies on hand before starting your rebuild prevents interruptions and keeps the process smooth. Essential items include gaskets, seals, piston rings, bearings, and assembly lubricants. Ensure that replacement parts are compatible with your engine model to avoid fitment issues.
Consider acquiring extra consumables like bolts, washers, and cleaning solvents. While it may seem like an added expense, having spares available can prevent delays caused by missing or damaged parts. For beginners, proper preparation with parts and supplies ensures the rebuild progresses efficiently and minimizes frustration during critical assembly steps.
Mental and Physical Preparation
Rebuilding an engine is physically demanding and mentally challenging, especially for someone with no prior experience. Approach the project with patience, curiosity, and a willingness to learn. Take breaks during long sessions to avoid fatigue, which can lead to mistakes.
Maintain a methodical mindset and treat each step as a learning opportunity. Keeping notes, taking photos during disassembly, and documenting observations helps track progress and serves as a reference during reassembly. Mental and physical preparation ensures that your first engine rebuild is both educational and rewarding, providing a solid foundation for future projects.
Step-by-Step Engine Disassembly
Disassembling an engine is the foundation of any rebuild, and doing it systematically ensures a smoother process during inspection, cleaning, and reassembly. For beginners, understanding the proper sequence and careful handling of parts is critical. Taking your time, labeling components, and keeping organized will prevent mistakes and make the rebuild far less intimidating.
Preparing the Engine for Disassembly
Before starting, make sure the engine is safely removed from the vehicle or securely mounted on an engine stand. Disconnect all wiring harnesses, fuel lines, and ancillary components. Draining all fluids, including oil and coolant, is essential to prevent spills and potential hazards during disassembly.
Taking photos or videos during this stage can provide a visual reference for reassembly later. Labeling each connector, hose, and bolt ensures nothing is misplaced. Using proper safety gear like gloves, eye protection, and steel-toed shoes keeps you safe while handling heavy or sharp components. For beginners, careful preparation is key to avoiding confusion and accidents during the next stages.
Removing External Components
Begin disassembly by removing the external parts attached to the engine, such as the alternator, starter, intake manifold, and exhaust manifold. This step exposes the main engine components and makes internal inspection possible. Take care to note bolt sizes and locations, as they vary between components.
Organize all removed bolts, nuts, and small parts in labeled containers or magnetic trays. This prevents losing critical fasteners and allows for quick reassembly later. Carefully inspect these components for wear, damage, or corrosion, as some may need cleaning, refurbishing, or replacement. For beginners, systematic removal of external components builds confidence and familiarizes them with the engine’s layout.
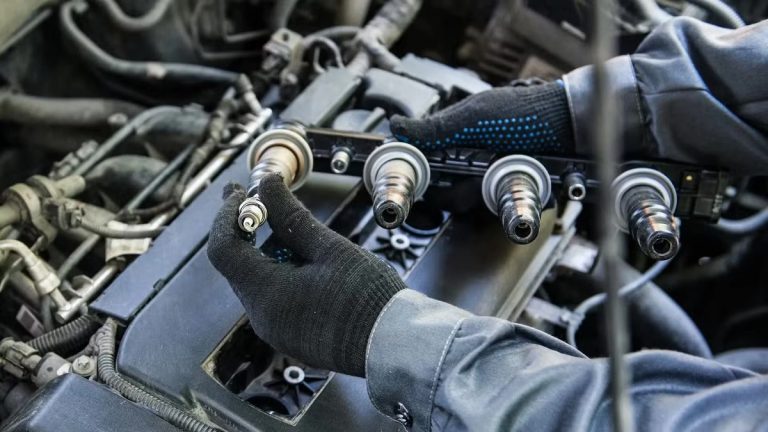
Cylinder Head and Valve Removal
After external components are removed, the next step is to disassemble the cylinder head and valves. Start by loosening the head bolts in the correct sequence to prevent warping or cracking. Once the head is removed, carefully extract the valves, springs, and retainers using a valve spring compressor.
Label each valve and spring according to its original location. Components often wear differently depending on their cylinder position, so maintaining their original placement is critical. Inspect valve seats, guides, and camshaft lobes for wear or damage. Beginners should focus on methodical removal and careful documentation to ensure all parts are correctly tracked and ready for inspection or replacement.
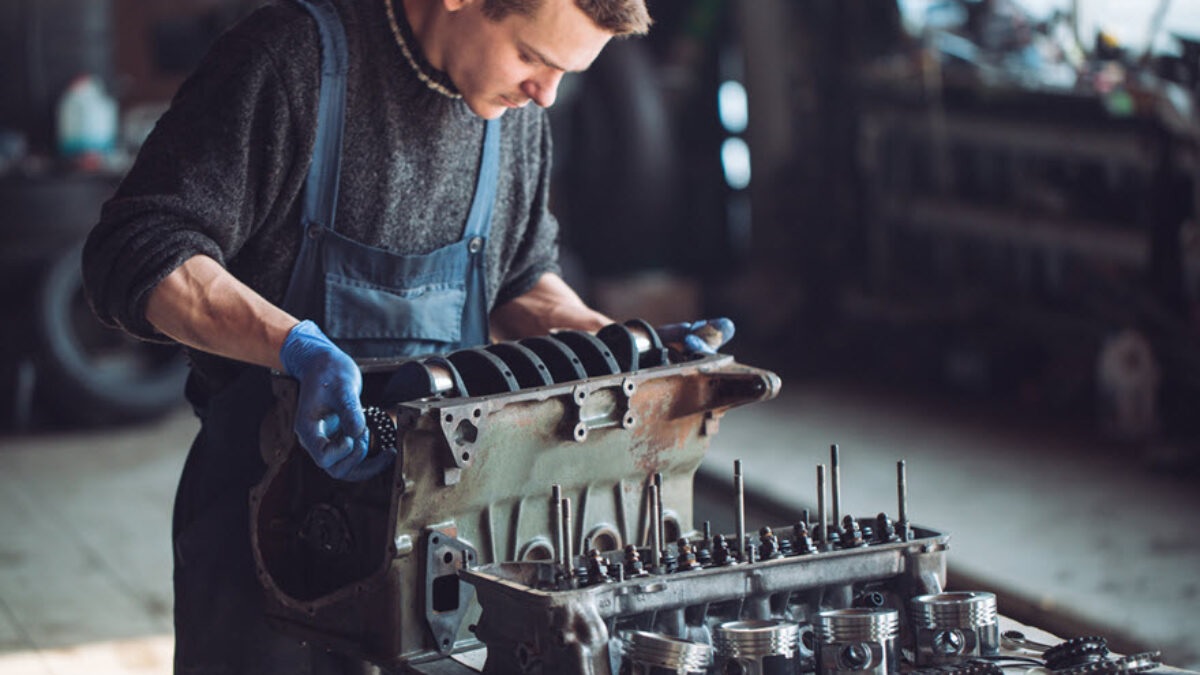
Pistons, Connecting Rods, and Crankshaft
With the cylinder head removed, the pistons, connecting rods, and crankshaft are accessible. Remove the oil pan and timing components to reach these parts. Carefully detach the connecting rod caps and push the pistons out of the cylinders. Store each piston and rod as a set to maintain proper matching for reassembly.
Inspect the crankshaft journals, bearings, and cylinder walls for signs of wear, scoring, or damage. Note any measurements or tolerances that are out of specification. Handling these components with care is essential, as scratches or dings can cause serious engine issues. Beginners should take their time during this stage, using labeled containers and protective wrapping to prevent accidental damage.
Timing Components and Accessories
Remove the timing chain, belt, gears, and tensioners carefully, noting alignment marks for future reference. Timing components control the synchronization between the crankshaft and camshaft, so accurate documentation is critical. Misalignment can lead to engine failure during reassembly.
Other internal accessories, such as oil pumps, lifters, and camshafts, should also be removed at this stage. Inspect these components for wear or damage and note which parts require replacement. For beginners, taking careful notes, labeling parts, and photographing alignment marks simplifies the reassembly process and reduces the risk of errors.
Organizing and Labeling Parts
Once all components are removed, organize them systematically on a clean workbench. Use labeled bins, trays, and plastic bags for bolts, washers, and small components. Document the parts with notes or photos, making it easier to reference during reassembly.
Segregate parts based on their function or engine location—cylinder head, pistons, crankshaft, timing components—to maintain order. Thorough organization prevents confusion, reduces errors, and ensures that all components are accounted for before starting the cleaning and inspection stage. Beginners will find that a well-organized workspace provides confidence and makes the rebuild process more manageable.
Cleaning and Inspection Readiness
Disassembly is not complete without preparing parts for cleaning and inspection. Remove gaskets, oil residues, and carbon buildup using degreasers, brushes, and cleaning solutions. Components should be free of debris before measurements or replacement decisions are made.
Ensure delicate parts, such as bearings, pistons, and valves, are handled carefully during cleaning to prevent scratches or damage. For beginners, understanding that proper cleaning is as important as disassembly itself sets the foundation for a successful rebuild, allowing accurate inspection and precise reassembly.
Engine Rebuild Process for Beginners
Rebuilding an engine for the first time can be intimidating, but breaking it down into clear, manageable steps makes the process achievable. Understanding the sequence of tasks, focusing on precision, and maintaining organization are critical for success. For beginners, following a structured approach reduces mistakes and builds confidence while ensuring the engine functions reliably after reassembly.
Disassembly and Documentation
The first stage of any rebuild involves carefully disassembling the engine. Begin by removing external components, including the intake and exhaust manifolds, alternator, and accessories, then move on to the cylinder head, pistons, and crankshaft.
As you work, document every step by taking photos, labeling parts, and storing bolts and small components in labeled containers. This helps prevent confusion during reassembly and ensures that each part returns to its proper location. Beginners should take their time during this stage, focusing on understanding how the components fit together and noting any areas of wear or damage for replacement.
Cleaning and Inspection
Once the engine is disassembled, thorough cleaning and inspection are essential. Remove all gaskets, carbon deposits, and oil residue using degreasers, brushes, and solvent baths. Cleaned components allow for accurate measurements and assessment of wear.
Use micrometers, calipers, and feeler gauges to inspect critical parts like pistons, cylinder walls, crankshaft journals, and valves. Check for scoring, warping, or cracking. Identifying worn or damaged components at this stage prevents future engine failures. Beginners benefit from taking detailed notes and photos to track the condition of parts and guide decisions for replacements or repairs.
Replacing Worn Components
Replacing worn or damaged parts is crucial to a successful rebuild. Commonly replaced items include piston rings, bearings, gaskets, seals, and timing components. Using quality replacement parts ensures long-term reliability and smooth engine operation.
Carefully follow manufacturer specifications for each replacement, particularly torque settings, alignment marks, and tolerances. Beginners should double-check part compatibility and installation instructions to avoid mistakes. Maintaining organization by keeping replacement components labeled and ready for installation streamlines the rebuild process and reduces the risk of errors during assembly.
Reassembly and Lubrication
Reassembly is the most critical stage, where precision and patience are essential. Begin with the crankshaft, connecting rods, and pistons, then reinstall the cylinder head, timing components, and external accessories. Use assembly lube and proper engine oil on moving parts to prevent friction and premature wear during the first startup.
Follow torque specifications carefully, using a torque wrench for bolts and fasteners. Pay attention to alignment marks, clearances, and sequencing. Beginners should work methodically, double-checking each step and comparing it with documentation from the disassembly stage. Taking a slow and steady approach ensures accuracy and prevents costly mistakes.
Final Checks and Testing
After reassembly, perform a thorough inspection before starting the engine. Verify that all bolts are tightened, electrical connections are secure, and fluids are at proper levels. A preliminary crank by hand can ensure smooth movement of the rotating assembly without binding.
Once the engine is ready, start it carefully and monitor for unusual noises, leaks, or vibrations. Pay attention to oil pressure and temperature readings. For beginners, taking these final precautions allows for early detection of potential issues and ensures a safe and successful first engine rebuild.
Reinstalling and Testing Your Rebuilt Engine
After completing an engine rebuild, the final stages involve carefully reinstalling the engine into the vehicle and performing thorough testing to ensure everything functions correctly. For beginners, taking time to follow proper procedures, double-check connections, and monitor performance is crucial for a successful startup and long-term engine reliability.
Preparing the Engine and Vehicle
Before reinstalling the rebuilt engine, ensure that all components are clean, properly lubricated, and ready for installation. Check that gaskets, seals, and mounting surfaces are in good condition and correctly aligned. Preparing the engine stand or lifting equipment is essential for a safe and controlled process.
Inspect the vehicle’s engine bay for any damaged mounts, hoses, or wiring that may interfere with the engine installation. Clear any debris and verify that all fasteners and brackets are accessible. Beginners should focus on methodical preparation to prevent complications during installation and ensure that the engine fits smoothly into its designated position.
Engine Reinstallation
Carefully lower the engine into the engine bay using a hoist or lifting device, aligning the motor mounts with their respective brackets. Take care to avoid pinching wiring harnesses, fuel lines, or coolant hoses. Secure the engine with the proper bolts, tightening them to manufacturer torque specifications.
Reconnect all components systematically, including the transmission, exhaust system, intake manifold, alternator, and cooling system. Reattach electrical connections, sensors, and vacuum lines, verifying that each component is properly seated. For beginners, working slowly and checking alignment at each step prevents damage and ensures a smoother start-up process.
Connecting Fluids and Systems
After the engine is physically installed, connect all fluid systems, including engine oil, coolant, fuel, and transmission fluid. Fill each system to the manufacturer’s recommended levels and bleed any air from cooling or fuel lines. Proper fluid levels are critical for preventing damage during the initial startup.
Inspect for leaks, kinks, or loose connections. Recheck all clamps, hoses, and fittings before attempting to start the engine. Beginners should take care to document fluid connections and verify compatibility to avoid costly mistakes or premature engine wear.
Initial Startup and Monitoring
Start the engine carefully, keeping a close eye on oil pressure, temperature, and any unusual noises. A first startup is critical for seating components such as piston rings and valve train parts. Allow the engine to idle gently while monitoring gauges and listening for irregular sounds.
Avoid high RPMs or heavy loads during the initial run. Check for leaks, vibrations, and proper fluid circulation. Record observations and be prepared to shut down the engine if anything appears abnormal. For beginners, patient monitoring during this stage ensures the rebuilt engine functions correctly and avoids early damage.
Test Driving and Fine-Tuning
Once the engine operates smoothly at idle, conduct a cautious test drive under controlled conditions. Gradually increase speed while monitoring performance, including acceleration, shifting, and temperature stability.
Pay attention to any vibrations, knocking, or unusual exhaust smoke. Fine-tuning components such as timing, fuel mixture, or idle speed may be necessary to optimize performance. Beginners should maintain a systematic approach, checking all systems periodically during initial use to ensure the engine remains reliable and performs as intended.
FAQs
Is It Possible To Rebuild An Engine With No Experience?
Yes, it is possible to rebuild an engine even if you have no prior experience, but it requires patience, research, and preparation. Beginners can start with simpler engines and focus on understanding the basics of disassembly, cleaning, and reassembly.
You should study service manuals, watch tutorials, and organize your workspace carefully. Labeling every part, keeping bolts and components in order, and taking photos during disassembly helps prevent mistakes. While challenging, a methodical approach ensures you can rebuild an engine successfully while learning essential mechanical skills.
What Tools Do I Need To Rebuild An Engine With No Experience?
Rebuilding an engine requires a mix of basic hand tools and engine-specific equipment. Essentials include wrenches, sockets, screwdrivers, pliers, torque wrench, and a breaker bar. Engine-specific tools like an engine hoist, engine stand, feeler gauges, and timing tools are also necessary for proper assembly.
Safety gear, including gloves, goggles, and protective clothing, is crucial. Setting up a clean, organized workspace will make the process manageable. Even as a beginner, having the right tools ensures you can disassemble, inspect, and rebuild components safely and accurately.
How Long Does It Take To Rebuild An Engine With No Experience?
The time required varies depending on your skill level, engine complexity, and preparation. For beginners, rebuilding a standard engine may take several days to a few weeks, as careful disassembly, cleaning, inspection, and reassembly take time.
Rushing increases the risk of mistakes, so it’s important to work methodically. Taking detailed notes, labeling parts, and double-checking torque specifications can slow the process initially but ultimately ensures success. Patience and organization are key to rebuilding an engine with no experience.
What Are The Biggest Challenges When Rebuilding An Engine With No Experience?
The biggest challenges include understanding proper torque specifications, identifying worn or damaged parts, and ensuring correct assembly order. Beginners may also struggle with tight tolerances, proper lubrication, and timing components.
Organization is another challenge; keeping track of every bolt, gasket, and part is crucial. Mistakes like incorrect assembly or using wrong parts can lead to engine failure. Overcoming these challenges requires patience, careful study of manuals, and seeking advice from experienced mechanics or online communities.
Can I Rebuild An Engine With No Experience Without Professional Help?
Yes, you can rebuild an engine independently, but having access to guidance is highly recommended. Service manuals, online tutorials, and forums provide step-by-step instructions that help beginners avoid critical mistakes.
Certain complex issues, like machining components or diagnosing hidden internal damage, may require professional intervention. Knowing your limits is important. You can rebuild most engines on your own with research, patience, and proper tools, but don’t hesitate to consult a mechanic if you encounter unfamiliar problems.
How Do I Avoid Mistakes When Rebuilding An Engine With No Experience?
Avoiding mistakes requires organization, preparation, and attention to detail. Label every part and take photos during disassembly to remember the correct placement. Keep bolts and components in separate containers for each section of the engine.
Follow service manuals strictly for torque specifications, clearances, and assembly order. Take your time, double-check each step, and use proper lubrication where necessary. Leveraging tutorials and community advice also reduces errors. By staying methodical, you can rebuild an engine with no experience while minimizing risks and ensuring proper operation.
Conclusion
Successfully completing an engine rebuild as a beginner is a rewarding achievement that combines patience, learning, and hands-on skill. Approaching the process methodically—from preparation and disassembly to cleaning, inspection, and reassembly—ensures that each step is executed carefully and safely. Understanding the function of each component and documenting your work builds confidence and reduces the likelihood of mistakes during critical stages.
For someone attempting rebuilding an engine with no experience, having the right tools, workspace, and reference materials is just as important as practical skill. Taking the time to research procedures, label parts, and measure tolerances allows beginners to achieve professional-quality results. Each challenge encountered becomes a learning opportunity that strengthens mechanical understanding and problem-solving abilities.
Ultimately, the key to success lies in patience, attention to detail, and a commitment to learning throughout the project. With careful planning, practice, and dedication, rebuilding an engine with no experience can transform from a daunting task into a highly educational and fulfilling accomplishment.